Sunday, August 30, 2009

Pulled Pork and Vinaigrette Coleslaw

This is one of my favorite times of year. The days are getting cooler, and the lazy days of summer and slipping away. You may think I just had a type error but really I enjoy Summer as much as the next person but I really like the hustle and bustle of Fall when you’re days fill up with new things to learn and do. I also have a serious LOVE for Halloween for some reason, so I always get excited when Fall arrives. The drop in temperature also means one thing to me, comfort food. Warm apple pies, and thick stews, and hearty slow cooked dinners (not slow cooker there is a difference, I haven’t had a lot of luck with a slow cooker but we’ll save that for another post). I love recipes that fill your house with heavy aromas that just speak to your soul and let you know you will have something warm and filling and simple and tasty. This is one of those perfect easy things to do that has an overall high acceptance level, at least in my house where they tired of fancy food long ago and are excited to have a pulled pork sandwich on ciabatta with a side of slaw. I found this recipe on the blog: My Husband Cooks. They ate the pork on tortillas with fresh salsa which after eating it I am planning on doing next week, but originally I had my heart set on sandwiches so that is what we made. Sooooooo very easy, and so tasty, and cheap. What more could busy people want? Maybe a warm apple pie for dessert but that too is for another post. Enjoy.

Slow-Roasted Pork Shoulder
Ingredients

7 lbs. pork shoulder (bone in)
1 cup dark brown sugar
¾ cup salt
2 tbsp. chili powder
2 tbsp. cumin
1 tbsp. red pepper flakes
½ tsp. cayenne

Method

To make the rub, Combine together the brown sugar, salt, chili powder, cumin, red pepper flakes and cayenne. Pat dry meat and liberally apply rub to all sides. Warning if you are not wearing latex gloves and you happen to have cuts on your hands from say playing guitar, washing them all day in a lab and again at home, and paper cuts from the 400 pages you just read and took notes on... this is going to hurt. A lot. A WHOLE LOT!


Whimper while washing sugar and cayenne out of paper cuts and place the meat in a container that is large enough to collect the liquid you are about to pull out of the meat, cover, and put it back in the refrigerator.


Cover and refrigerate for as long as 24 hours, or as little as overnight. It will give up a cup or more of liquid so make sure your container is big enough to prevent spillage.

Remove the shoulder from refrigerator, brush off any excess or caked on rub. Move to a clean roasting pan with the fat side up.

Heat the oven to 275F. Place in the oven and let roast for 9 to 10 hours. Mine took about 7 but it was cooked for 8 since I was at class and my husband was sick... oops. After about 3 hours, there will be enough fat rendered to allow you to baste the shoulder every 1 to 2 hours. With a large spoon simply pour the rendered fat over the shoulder.

You will know it’s ready because the outside of the shoulder is extremely dark, nearly burned looking, I am repeating... LOOKING not actually burnt. Mine was a little burnt but it still tasty so good... I may have mentioned that. The pork should pull easily from the bone and the fat/skin on the top should be nearly crispy.

Remove from the oven and let rest for at least 30 min. Using a pair of forks or very clean hands pull the pork away from the bone. From here you can eat it in a sandwich, a tortilla, add some BBQ sauce to it, make a pie, take a bath in it, whatever floats your boat.

Now the only thing left to decide is what to serve with a pulled pork sandwich, ummm coleslaw of course. However the husband is from Canada and always complaining about the mayonnaise Coleslaws we tend to eat here in the States so I made this for him. It was the first time I have ever made it (as a lot of things on here are) but it will go in the binder to be made again. Especially next summer. Crispy and clean it was perfect with the sandwhich.

Vinaigrette Coleslaw


Adapted from Food Network

Ingredients

1 small head of green cabbage head, shredded
1 small red cabbage head, shredded
1 large red pepper, sliced thin
1 carrot, thinly sliced
1 small onion, finely chopped
1 ½ cups sugar
1 cup apple cider vinegar
¾ cup vegetable oil
1 tablespoon kosher salt

Method

Combine cabbage, pepper, carrot, onion and sugar. Mix well and set aside. Combine vinegar, oil and salt in a saucepan, and bring to a boil.

Pour over cabbage mixture and stir well. Cover and refrigerate 2-3 hours to chill.

Put cabbage in strainer to drain off the liquid. Place the slaw back in the bowl and serve.

Sunday, August 23, 2009

Six-Mile Granola

Making one's own homemade granola.... requires very little actually. I have no idea why I've never made it before, but I will definitely be making it again, and very soon.

This recipe was named for the family vacation home of the featured family in Martha Stewart’s living July 2007. You may know the type of family if you read the magazine. If you don’t then let me explain it to you, it’s one of those families, you know those families, that owns really great vacation property in really great locations, like on clear glass lakes, with a backdrop of mountains and woods, with a cute cabin on a 320-acre estate, which to me contradicts the term cabin. Cabin/estate… doesn’t really flow…. that has been handed down through the generations (although on closer read it turns out it has been sold in shares to other families as well, so I guess it’s more like a time-share, takes out some of the nostalgia).

This family gets up at O’Dark thirty and makes homemade granola before sending their ridiculously cute kids with ridiculously cute names like Hazel and Denim (true story) out to fishing a canoe with grandpa, while the parents take a lazy nap on a blanket while one of their relatives paints the surround scenery (really? come on now), then they all eat a delicious meal at a huge table that looks like it’s about to fall apart but probably cost five thousand dollars from a very trendy store in New York that was carried to Montana on horseback, with horses that are being led by blind nuns, wearing very trendy habits. Anyway, after dinner they all converge on a giant fire pit on the pebble beach (this is no lie) where everyone laughs and eats gourmet S’mores and sips hot chocolate from boutique cups while wrapped in warm sweaters and moccasins that just happens to be produced by cousin so and sos organic clothing line. You know the kind of family and events and property that make you feel like maybe you’ve been slacking a little in the life department? I want a five thousand dollar nun carried table! I think I may have gotten off track. What were we talking about? Oh yes granola. Ridiculousness aside, I have to say that this particular family does make a mean granola before flouncing about in their trendy lives. It is very tasty so maybe I should leave my small diatribe for the moment and actually give you the recipe and the story that goes with making it, a little more realistic than the above scenario I might add. Let’s be honest, if that were my life, I would probably fall out of the canoe, spill the paint on the blanket and the sleeping relative, and then burn down the table with a flaming gourmet S’more.

Let us begin at the beginning… because where else would you start? What is the first thing you should when you make a recipe? Anyone? Yes, very enthusiastic person in the back? Correct you should READ THE ENTIRE recipe. I know this. Most people know this, but yet… it doesn’t always happen. Even when you have read the recipe ten times as my OCD personality requires. So now you find yourself standing in front of the stove with ingredients, throwing them in the pot with abandon and stirring all the gooey, melting, goodness and you get to the end where it says pop the granola in the oven and cook for 1 ½ hours, what? Wait, where did that line come from? Was that there before? Oh and it also says cool after cooking before adding dried fruit and storing. How long is THAT going to take? Man, well that sucks! Too late it’s already in the oven. Besides I did make a special trip to the co-op which translates into $100 worth of ingredients when you could get them at the grocery store for like $20, but you feel a whole lot better about yourself for supporting your local store and farmers, sorry where was I? That should have been the name of this blog! Okay so it’s late and I’m sleepy and I am waiting for my granola to cool which happened quickly, thank you universe.

Now You might think that this was bad timing, and under normal circumstances you would be right, but what I haven’t mentioned yet was that Kylie (my teenager) was kind enough to trek to the co-op with me, photograph some of the ingredients, hand me ingredients, read me the recipe as I added stuff just to be safe, in case the first ten times through I missed something…. like say the cooking time… which she missed too by the way, and generally hang around with me and make me laugh for the full two hours. I must say that anything that gets your teenager to spend one of her last free nights with you instead of friends with less than a week before University starts… well…. that may just have to be a Mom’s new favorite dish, and maybe life without a scenery painting, organic company owning cousin (honestly I’d have to torment those people if they were my family) isn’t so bad after all.

Six-Mile GranolaAdapted from Martha Stewart Living July 2007

Ingredients
Makes about 12 cups (I halved the recipe for my batch)

3 tablespoons unsalted butter
½ cup light-brown sugar
½ cup brown-rice syrup or honey (I used honey because I’m guessing Nebraska has never heard of brown-rice syrup)
2 teaspoon pure vanilla extract
1 ½ teaspoons coarse salt
½ teaspoon ground cinnamon
1 cup water
4 ½ cups rolled oats
½ cup wheat germ
½ cup bran
1 cup raw cashews
1 cup raw almonds
1 ½ cup unsweetened shredded coconut
2/3 cup dried cherries
2/3 cup golden raisins


Method


Preheat oven to 250 degrees. Melt butter in a saucepan over medium-low heat. Add sugar, and cook until melted. (I don't really know what constitutes melted sugar... I assume it is when it looks like this...)


Stir in brown-rice syrup or honey, vanilla, salt, cinnamon, and water. Add remaining ingredients, except dried fruits, and toss. Arrange in a single layer on two rimmed baking sheets (or one if you’ve halved the recipe…duh). Bake, stirring occasionally, until golden brown and dry, about 1 ½ hours. Let cool on sheets. Transfer to a bowl and add dried fruits. Granola can be stored in an airtight container for up to 3 weeks.


Serve over plain Greek yogurt, drizzle with local, organic honey, and fresh berries. Any yogurt will work but Greek is a little more sour than regular yogurt and really makes a huge difference in flavor.

Wednesday, August 12, 2009

Rosemary Polenta

Gluten-free…. Where are you?

Has anyone else noticed that I have fallen off the gluten-free wagon? Any of you four readers out there? Me too! Especially my head which has been pounding, and my energy levels which have been zapped to zero! I apparently was correct in thinking I had a gluten intolerance, I am however grateful not to have Celiac’s Disease because it is REALLY difficult, and expensive to get started on a gluten free diet (although if you need to see the right for the link to Gluten-free girl… she’s amazing).

Cardboard waffles, and $6 loafs of bread are not my idea of a good time. I like full flavor and if it doesn’t taste good, I don’t want it at all, like with diet drinks. I also have a sweetner sensitivity, I can’t handle the stuff I end up in bed sick to my stomach with a killer migraine that can last for days! Not to mention it tastes terrible. It’s nothing but chemicals, why put that stuff in your body? Nature did not design us to digest that stuff and it causes cancer in lab rats. Just bad, so what do I drink when on a diet. Ready for it? Water, brewed tea, and coffee. All zero calories on their own, all natural, and gasp…. good for your body!

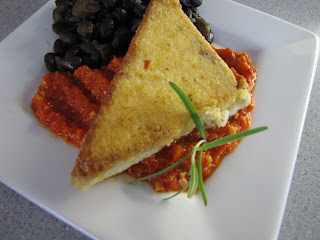
Where was I? Oh yes… gluten… sorry. Anyway… my thought on fake sugars carries over to my gluten-free stuff. Since I can technically eat gluten, I’m super careful about things being pure, if you are gluten-free please take precautions to use guaranteed gluten-free products, I just watch my intake and try to only eat it one meal a day. I don’t have to spend extra or make special bread or pasta, and I don’t end up sick and tired. For the other meals I just avoid it completely. Hence the birth of this recipe. Inspired but probably nothing like Penny Cluse’s (in Burlington, Vermont) Polenta and Black beans with Ranchero Sauce. A full meal, easily made vegetarian (lacto-ovum vegetarian that is) by switching out chicken stock for vegetable stock, but filling and tasty enough you won’t miss the gluten because it was never suppose to be there to begin with. Enjoy.

Rosemary Polenta

Ingredients

4 tablespoons, unsalted butter
1/4 cup olive oil
1 tablespoon minced garlic (3 cloves)
1 teaspoon crushed red pepper flakes
1 teaspoon minced fresh rosemary leaves
1/2 teaspoon kosher salt
1/2 teaspoon freshly ground black pepper
3 cups chicken stock, preferably homemade
1 cups half-and-half
1 cups milk
2 cups cornmeal
1/2 cup good grated Parmesan

Method

Heat the butter and olive oil in a large saucepan. Add the garlic, red pepper flakes, rosemary, salt, and pepper and saute for 1 minute. Add the chicken stock, half-and-half, and milk and bring to a boil. It will look like this when you first add all the ingredients.


Remove from the heat and slowly sprinkle the cornmeal into the hot milk while stirring constantly with a whisk. Cook over low heat, stirring constantly, for a few minutes, until thickened and bubbly. Like so.


Off the heat, stir in the Parmesan. Pour into a 9 by 13 by 2-inch pan, smooth the top, and refrigerate until firm and cold. (I did overnight)


Cut the chilled polenta into 12 squares as you would with brownies. Lift each on out with a spatula and cut diagonally into triangles. Dust each triangle lightly in flour (use rice flour for gluten-free). Heat 1 teaspoon of olive and 1 teaspoons of butter in a saute pan and cook the triangles in batches over medium heat for 3 to 5 minutes, turning once, unti browned on the outside and heated on the inside.
Add more butter and oil, as needed. Serve immediately.

Tuesday, August 4, 2009

Chicken Scallopini


There are some dishes that my family think of as my dishes when in fact they came from someone else all together. This one in particular I even forget is not mine because I make it so often, however it is not mine. It is from one of the first people I met when we moved to Nebraska who has since moved away to Colorado. Thank you, J. Everyone loves this quick and easy dish. Tonight I managed to have it put together in about 30 minutes. That's a record. I serve this over pasta, the sauce is flavorful enough that we just place the chicken over the past and spoon the sauce on. Add grated quality Parmesan.


Chicken Scallopini with Olive and Sun-Dried Tomato Sauce
Ingredients

2 tablespoons olive oil
1/2 stick (4 tablespoons) unsalted butter, cut into tablespoon pieces
1/2 cup all-purpose flour
1 lb thinly sliced chicken cutlets (scallopini; 3/4 inch thick)
1/3 cup dry white wine
1/3 cup reduced-sodium chicken broth
1/2 cup drained oil-packed julienned sun-dried tomatoes
1/3 cup drained pitted brine-cured black olives, coarsely chopped


Method

Put oven rack in middle position and preheat oven to 200°F. Heat oil and 2 tablespoons butter in a 12-inch heavy skillet over high heat until foam from butter subsides.

Meanwhile, spread flour on half of a shallow baking pan. Working with 2 or 3 slices at a time, transfer chicken to flour in 1 layer. I slice the breast in half lengthwise and call it close enough.

Lightly season top side of chicken with salt and pepper, turn over to coat completely with flour. Shake off excess flour and stack slices on other half of pan.

Sauté chicken in batches without crowding, turning over once, until browned and just cooked through, about 3 minutes per side. Transfer to a platter after browned and place in oven to keep warm, add new cutlets to skillet as space becomes available. When all of chicken is cooked, bring wine, broth, tomatoes, and olives to a boil in same skillet, stirring and scraping up any brown bits, then add remaining 2 tablespoons butter and swirl skillet until butter is incorporated. Remove from heat and season with salt and pepper. Pour sauce over chicken.

Makes 4 servings.